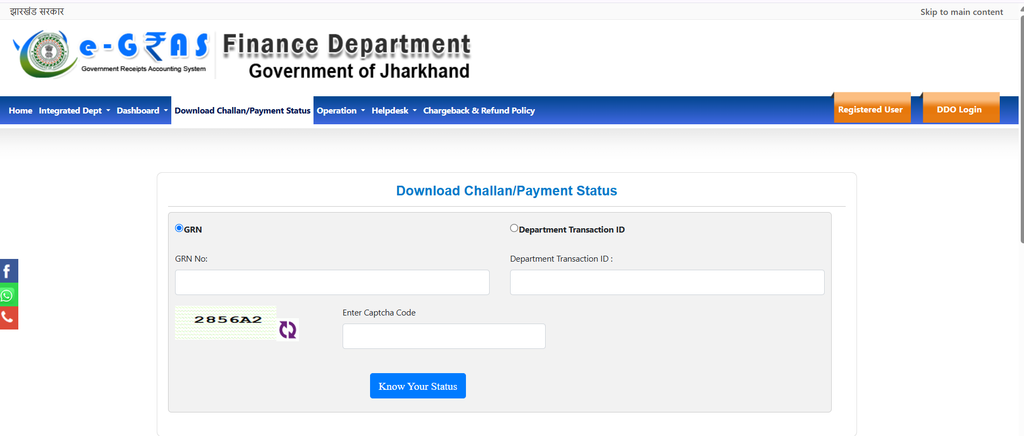
Paying a government challan online can be confusing if you are using the Jharkhand e-GRAS portal for the first time. You may need to generate a challan, verify the payment details, choose a payment method, complete the transaction, and finally download the payment receipt.
This guide explains the Jharkhand e-GRAS challan process from start to finish in a simple, practical way. It is written as a general tutorial, so it can be used by anyone who needs to make an eligible government payment through Jharkhand e-GRAS.
Important: The exact fields and payment options can vary depending on the type of government payment. Always use the instructions supplied by the concerned department or authority for your particular transaction.
What is Jharkhand e-GRAS?
e-GRAS is the Government of Jharkhand’s electronic system for government-receipt payments. It allows users to generate challans and make eligible government payments through electronic or permitted manual payment methods.
Official e-GRAS Portal:
Jharkhand e-GRAS Official Portal
The system also provides facilities for checking challans and payment status.
NGDRS vs e-GRAS: What Is the Difference?
This is particularly important for people making property-registration payments.
NGDRS
The Jharkhand Registration Department’s NGDRS system is used for registration-related services and fee calculations.
Jharkhand NGDRS Official Portal
e-GRAS
e-GRAS is the government-receipt/payment system through which applicable government payments can be processed.
In a property-registration workflow, you may therefore encounter NGDRS first and e-GRAS during the government-payment stage.
Before You Start
Keep the following information ready:
- Mobile number
- PAN/ID details, if applicable
- Name of the person/company making the payment
- Department/payment purpose
- District/treasury details, where applicable
- Correct amount
- Relevant government payment/accounting details
- Any reference number supplied by the concerned department
- Bank/payment method required for the transaction
Do not guess government accounting codes
If the challan requires information such as a Department, Treasury, Major Head, Minor Head or Sub-Head, use the details provided by the concerned government department/authority.
Do not select an accounting head simply because it appears to be similar.
Step 1: Open the Official Jharkhand e-GRAS Website
Open the official Government of Jharkhand e-GRAS portal:
Avoid using unofficial websites when entering payment or personal information.
Step 2: Choose the Appropriate Login Option
Depending on your requirement, e-GRAS provides access for registered and guest users.
Guest User
A guest login can be useful for someone making a payment without maintaining a regular registered-user account.
The official guest-user documentation describes authentication using a mobile number and OTP.
Registered User
A registered account is useful for users who make government payments regularly and need access to transaction information/history.
Step 3: Login as a Guest User
If you are using the guest option:
- Enter your mobile number.
- Select Get OTP.
- Enter the OTP received on your mobile.
- Enter the captcha shown on the page.
- Complete the login process.
The exact appearance of the page may change as the government website is updated.
Step 4: Start the Challan Process
After logging in, open the appropriate challan/payment option.
The options available to you can depend on whether you are:
- Creating a new government challan
- Paying a challan already generated
- Checking an existing transaction
- Downloading a previous challan
If another person or department has already generated the challan for your transaction, do not create a duplicate challan.
Step 5: Enter the Required Challan Details
The challan form can contain several fields depending on the payment type.
Typical information may include:
- Department
- District
- Treasury
- Financial year
- Remitter name
- Address
- PAN/ID
- Payment purpose
- Accounting/Head details
- Amount
- Payment mode
The official e-GRAS manuals provide guidance on the fields used in the challan-generation process.
Step 6: Enter the Amount Carefully
Enter the amount specified by the relevant department, authority, or official calculation.
Before submitting, compare the amount with your supporting document.
Never rely only on a message such as:
“Please pay ₹XX,XXX.”
Instead, confirm that the amount comes from the official challan or authorized calculation.
This is especially important for property registration, taxes, government fees and other high-value transactions.
Step 7: Review the Challan Before Submission
This is one of the most important steps.
Before clicking Submit, carefully review:
Applicant/Remitter
Is the name correct?
Department
Is the correct department selected?
Purpose
Does the payment purpose match the actual transaction?
Treasury/District
Are the location details correct?
Accounting Details
Are the relevant government heads/codes correct?
Amount
Is the amount correct?
Mobile/PAN/ID
Are the details entered correctly?
If anything looks wrong, stop and verify it before submitting.
Step 8: Submit the Challan
Once all information has been checked, submit the challan.
The e-GRAS system generates a GRN — Government Reference Number.
What is GRN?
The GRN is an important reference number for your government payment transaction.
Save it immediately.
For example:
GRN: ______________________________
You may need it later to check the challan or payment status.
Step 9: Save the GRN
Don’t rely on your browser history or SMS alone.
Save the GRN in at least two places.
For example:
GRN: XXXXXXXXXXXX
Save it in:
- Your transaction folder
- Accounting records
- A secure digital record
Step 10: Choose the Payment Method
Depending on the transaction and options available, e-GRAS supports:
Electronic Payment
Payment through the available online banking/payment options.
Manual Payment
For applicable transactions, permitted manual payment methods may also be available.
The exact options depend on the challan and government payment category.
Step 11: Make the Online Payment
If electronic payment is selected, the general process is:
e-GRAS
↓
Select payment method/bank
↓
Payment gateway/bank page
↓
Authorize payment
↓
Payment processed
↓
Return to e-GRAS
The official e-GRAS documentation describes the electronic payment workflow and the subsequent recording of the transaction.
Step 12: Do Not Close the Browser Immediately
After completing payment, wait for the transaction to return to e-GRAS.
This is important because a bank/payment gateway may show a successful debit while the government portal has not yet received the final status.
Wait for the final status/confirmation page.
Step 13: Check the Payment Status
After payment, verify that the transaction has been successfully recorded.
The e-GRAS system uses transaction identifiers including:
- GRN
- CIN
- Bank/reference details
The CIN (Challan Identification Number) is generated as part of the successful payment process.
Step 14: Check or Download Your Challan
Jharkhand e-GRAS provides an official page for checking/download of challan and payment status.
Official Challan Verification Page
e-GRAS – Download Challan / Payment Status
The page currently provides options involving:
- GRN
- Department Transaction ID
- Captcha
- Verification/OTP
Step 15: Enter the GRN
On the challan verification page:
- Enter the GRN.
- Enter the Department Transaction ID if required.
- Complete the captcha.
- Complete OTP verification if requested.
- Submit/verify the transaction.
The GRN is the primary reference you should retain for the transaction.
Step 16: Check the Payment Status
Review the result carefully.
Depending on the transaction, you may see information such as:
- GRN
- Amount
- Transaction date
- Bank reference
- CIN
- Payment status
Look for a successful/paid status.
If your bank account has been debited but the government portal doesn’t yet show successful payment, don’t immediately make another payment.
First check the transaction/reference details.
Step 17: Download the Receipt
Once the payment is successfully recorded, download the available challan/receipt.
Save it as a PDF.
A useful naming system is:
eGRAS_GRN_[GRN NUMBER]_Paid.pdf
For example:
eGRAS_GRN_123456789_Paid.pdf
Step 18: Keep the Payment Records
For every government payment, maintain the following:
| Record | Keep it? |
|---|---|
| Original challan | ✅ |
| Paid challan/receipt | ✅ |
| GRN | ✅ |
| CIN | ✅ |
| Bank transaction/reference number | ✅ |
| Payment date | ✅ |
| Supporting document | ✅ |
This makes future verification, accounting and audit work much easier.
Step 19: Send the Receipt to the Relevant Person/Department
If the payment was made for:
- Property registration
- License
- Government application
- Tax/fee
- Court-related payment
- Any other official process
send the successful payment receipt to the person/department handling the underlying transaction, if required.
Special Section: Property Registration Payments
For property-registration transactions, don’t confuse:
Property registration fee calculation
with
Government payment of the resulting challan.
The registration process may involve NGDRS and then government-receipt/payment processing.
General workflow
Property/registration details
↓
NGDRS calculation/registration process
↓
Government fee/stamp-duty determination
↓
Challan/payment details
↓
e-GRAS payment
↓
GRN/CIN
↓
Paid receipt
↓
Registration process continues
Official NGDRS:
Official NGDRS Fee Calculator:
What If You Already Received a Challan?
If a deed writer, department, consultant or authorized person has already provided you with a challan:
Do this:
1. Check the challan
↓
2. Locate the GRN
↓
3. Verify the transaction
↓
4. Check the amount
↓
5. Check the beneficiary/government payment details
↓
6. Make the payment using the specified method
↓
7. Confirm successful payment
↓
8. Download the paid receipt
↓
9. Send the receipt to the concerned person/department
Don’t do this:
❌ Create another challan unnecessarily
❌ Change government accounting codes without confirmation
❌ Change the amount without authorization
❌ Pay using an unofficial website
❌ Assume a bank debit automatically means the government payment is complete
❌ Make a second payment immediately after a failed/uncertain transaction
Common Problems and What to Do
Payment failed but money was deducted
Don’t immediately pay again.
First check:
- Bank transaction status
- GRN
- Payment/reference number
- e-GRAS payment status
If necessary, contact the relevant bank/e-GRAS support with the transaction details.
Payment successful at bank but e-GRAS shows pending
Wait for the transaction to update and then check the official payment-status facility.
Keep the bank transaction proof.
Wrong amount on challan
Don’t pay.
Contact the person/department that generated the challan and ask them to verify/correct it.
Wrong department or accounting head
Don’t guess the correct code yourself.
Get confirmation from the concerned government authority.
Can’t find the challan
Use the official challan/payment-status page:
e-GRAS Challan Status / Download
Use the GRN or other transaction information requested by the portal.
Official Resources
e-GRAS
Jharkhand e-GRAS Official Portal
Challan Status / Download
e-GRAS Challan Verification & Payment Status
e-GRAS FAQ
e-GRAS User Manuals
NGDRS
Jharkhand NGDRS Official Portal
NGDRS Fee Calculator
Quick Checklist
Before Payment
☐ Correct challan
☐ Correct remitter
☐ Correct department
☐ Correct purpose
☐ Correct accounting details
☐ Correct amount
☐ GRN recorded
During Payment
☐ Correct payment method
☐ Authorized bank/payment account
☐ Payment completed
☐ Waited for return to e-GRAS
☐ Successful status confirmed
After Payment
☐ GRN saved
☐ CIN saved
☐ Bank reference saved
☐ Paid challan downloaded
☐ Receipt saved
☐ Receipt sent to relevant person/department
Final takeaway
The safest way to remember the entire process is:
Get/Generate Challan → Check Details → Submit → Get GRN → Pay → Wait for Confirmation → Get CIN → Verify Status → Download Receipt → Save & Share